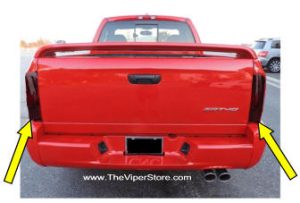
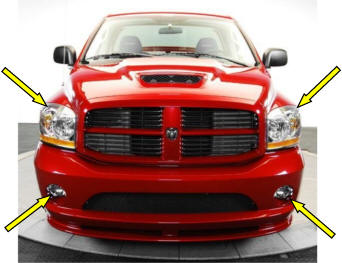

Description
You receive four high-quality light lens adhesive vinyl overlays: one for each headlight and one for each fog light.
These adhesive vinyl overlays are made from the highest quality material available. They protect against chips and cracks and give your Viper truck a race car look!
Includes four pieces:
- Headlight overlays – right and left
- Fog light overlays – right and left
Viper truck replacement lenses cost at least $750 for one light. Protect your investment today. When installed properly, they will stay in place and will not come off due to heat, cold, or vibration.
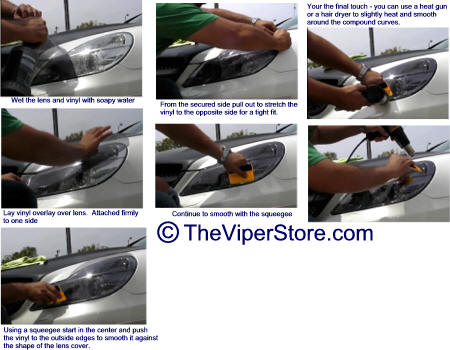
INSTALLATION INSTRUCTIONS
Included: Headlight lens film vinyl tints, soft squeegee
For installation, you will need: household rubbing alcohol, a soapy water mixture (one full spray bottle of water with a couple of drops of baby shampoo or mild dish detergent). You may also need a hair dryer.
WARNING: It is essential to follow every step without skipping anything to ensure that you mount your lens guards professionally.
- Prepare both headlight lenses by washing with soap and water to remove dirt and grime. Dry the lens completely and scrub it with household rubbing alcohol.
- Test your cleaning. Take a piece of masking tape and see if it readily adheres to both of your headlight lenses. If it does not, continue cleaning until it does.
- As a test (without sticking it on), place your unpeeled headlight guard over your headlight and note its fit. You now have an idea of how it sits on the plastic headlight lens. NOTE: If your headlight lens is bulbous with tight compound curves, you will need to use a hair dryer to heat the vinyl lens until it is soft and malleable. Once softened, it will be easier to form around complex curves.
- You have been provided with a soft felt squeegee. Starting at the center of the light lens, use the squeegee to work the fluid out in all directions until the lens guard has completely adhered. If you need to stretch or mold your tint around complex curves, use a hair dryer to soften the vinyl for easier molding. When finished, there should be no air bubbles under the tint.
- Repeat the entire process for the opposite side.
- Repeat the entire process for the fog lights as well.
NOTE: Once these are removed, they cannot be reinstalled as the adhesive is compromised.