
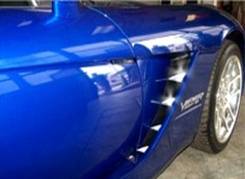
DODGE VIPER SRT10
FENDER VENT COVERS
PART # ACC-972026
INSTALLATION INSTRUCTIONS
Included:
4 x Left Side Vent Louver Covers & 4 x Right
Side Vent Louver Covers (each marked which louver they go on), 2 x Tape
Test kits, 2 x Promoter Packets
NOTE:
Your new covers come to you with a protective liner. Do not remove liner
installation is complete.
1. Clean all four (4) Mat Black Vent Steps or (louvers) including the very bottom of the opening. Use a damp cloth to remove any road grime and dirt. Then scrub these areas with a household rubbing alcohol and re-wipe down with a damp cloth and let dry.
2. BEFORE you mount your vent
covers - You want to test the adhesion of the body
surface. Using the test strip tape (provided) or a piece of
masking tape, stick it to several areas on the cars body where you will
be mounting your trim covers. If the tape sticks readily proceed
to the next step. If not continue to clean until the test tapes
stick everywhere.
3. Each
vent step Cover has been marked Drive Side 1, 2, 3, or 4 and Passenger
Side 1, 2, 3, or 4. Before you permanently install your new covers take
a minute to place each one on its’ corresponding vent louver to see how it
will fit. This is your trial run. You can get a feel of how each piece
will fit and to make sure you have every piece and it fits.
You find that each cover will have to be manipulated into each cavity at
a slight angle to tuck it into the fender space between the vent louvers.
This will give you the clearance necessary to lay the cover down and
over each vent step. Once you aquatinted yourself with the knowledge of
how each louver cover is to be set in place you may begin the
installation.
4. You
have been provided with two adhesive promoter packets. Use one of them
and swipe the areas where the steps will rest on that you just cleaned.
PLEASE NOTE THAT ONCE YOUR COVERS HAVE BEEN STUCK INTO PLACE THEY CANNOT
BE REMOVED WITHOUT DAMAGING THEM SO TAKE YOUR TIME.
5.
Remove the red plastic liner from the #4 Cover (the Bottom Plate) and
place it into position. Press down firmly once it is in place. Then
work your way up to the top cover one piece at a time.
6.
Follow the same procedure on the other side of the car until all vent
steps are firmly in place.

TheViperStore.com a
HotCarAccessories.com website