This page has opened into a NEW
Window

DODGE Viper SRT-10 (2003-2006) Fuel Rail Covers
High Polished Stainless Steel
PART #
ACC-973006
INSTALLATION
INSTRUCTIONS
PARTS INCLUDED:
2 x Stainless Fuel Rail Inserts, 6
x Chrome Bolt
Covers 123NC
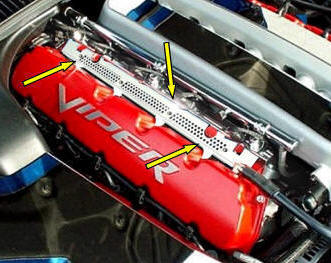
These new and
unique inserts have been designed to enhance the intake manifold and fuel rail
assembly with a sleek high performance look. They are made of high grade 304
stainless steel vented to allow heat dissipation and yet add to the overall
appearance of the viper power house engine.
-
Starting with the passenger side, Remove the
three fuel rail bolts and set aside for a moment. Manipulate the correct
rail under the wiper cowl ridge over the engine so that you can insert the
insert with the teeth into the valve cover slots. Gently set the insert back
as you carefully manipulate the injectors and injector wires so as to allow
the insert to set in place over the fuel rail bolt hole exposed earlier. You
may also need to gently force the new rail under the pressure port cap just
to the right side of the fuel rail. Allow the wires to rest between the
angled top edge of the new insert and the chrome fuel rail itself. This will
also be the placement for the driver side.
- Align the
three holes and then insert the factory bolts and tighten.
- You have
been provided with three chrome decorative bolt caps. Place the caps over
the bolts and firmly press them on.
- head screw
driver push in the upper and lower cable retainer tabs in towards the
retainer to release the cable from the cable bracket and pull it completely
out and set aside.
- Using a
pair of needle nose pliers squeeze the metal clamp on the hose just to the
right side of the fuel rail and pull it forward to release the hose, detach
it and set aside. Pull the vacuum hose on the left side by pulling it
straight up.
- This next
step will be the trickiest part of the whole installation. Manipulate the
new insert over the left vacuum tube through the new insert hole being
especially careful not to allow the
tube to become detached from the under side of the throttle body. This tube
although doable will be difficult to reinsert. The best way to prevent this
is to manipulate the new insert over the tubes rubber elbow rather then
forcing the elbow through the insert. This will reduce the pushing and
pulling on the tube that may cause detachment. Once you have managed to get
the tube through the hole then work it down the tube to get it as close to
the fuel rail as possible to allow you to manipulate the insert into the
valve cover notches. Try to insert the cover into the notches as it slides
under the wiper cowl ridge. In this procedure you will need to look along
the entire length of the insert in order to identify any and all areas that
may catch and impede the installation.
NOTE: It is important to know that the
teeth of the new cover go in first so that the insert will be able to be set
back into position. Once you have succeeded placing the insert into position
simply reinstalls the factory bolts, vacuum tubes and throttle cable. Then
finally press the decorative bolt covers in place.
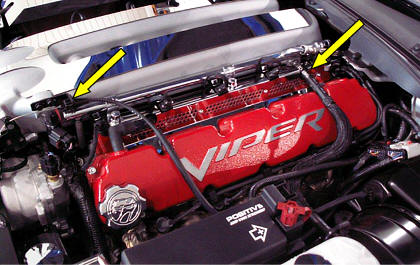
7. Now that you have
successfully installed the passenger side insert you should be familiarized with
just how to install the driver side. The only difference is that the driver side
has a
couple of hoses you will need to remove as well as the throttle cable. To
begin roll the throttle cable retainer slightly as to allow you to remove it
from the throttle bracket and roller
tension spring. Then using a small flat
head screw driver to pry open the bracket holding the throttle cable ball end.
Take off the remaining hoses so that you can maneuver the fuel rail cover into place. Once the cover is secured
replace the hoses.el
8. Take a tube of clear adhesive silicone (found at any
hardware department) and put a healthy sized amount inside each of the plastic
chrome caps. Set each of the caps on over the
factory bolts and let dry for
12 hours.
If any questions occur during installation, please contact
admin@theViperStore.com
TheViperStore.com a
HotCarAccessories.com website