
DODGE Viper SRT10 Side Exhaust Tips 2pc
with Drill Adapter Kit
PART # ACC-972006 and # ACC-972035
INSTALLATION INSTRUCTIONS
PARTS INCLUDED:
2- Stainless Tips; 2- Set Screws;
1- 90º Drill Adapter tool; 1- small screw driver
head; 1- small drill bit
These
new tips are made of 304 stainless that is triple chrome plated for a
beautiful super high luster finish that will last forever.
1.
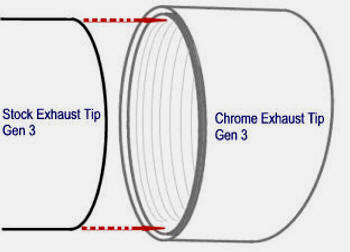
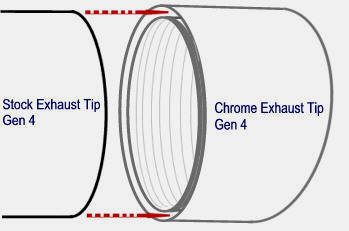
IMPORTANT - Fitment Information: Gen 3
(2003-06) This Tip will fit completely over your
or
Gen 4 (2008-10) The stock Tip will fit in between the two walls of
stock exhaust.
the Tip over your stock exhaust.
Viper Gen3
(2003-06) Tips
The first step for this installation will be to set the tip in place over the factory exhaust pipe (see above for exact fit based on year of Viper) and rotate the tip so that the larger side of the angle cut will sit towards the rear of the car. The tip is designed to fit tight and will need to be lightly tapped into a set position using a rubber mallet. Do NOT use a hammer or hard dead shot mallet as this can damage the tip. A common SOFT rubber mallet will allow you to gently set the tip in place.
2. The next step will be to install the set screw. Using the Right Angle Drill Adapter with the pilot a 9/64 bit - drill a hole just inside the factory exhaust pipe at a 10 o'clock position for the driver side and a 2 o'clock position for the passenger side. Because you will be drilling through two layers of metal you will want to ream the hole a little so as to allow the set screw to be inserted without binding or jamming. Due to the hard nature of the stainless tip it is also important to know that you will need to use a hard cobalt drill bit for this pilot hole.
3. Once you have e piloted the hole
simply insert the small black washer head style screws provided using
your Right Angle Drill Adapter and the Phillips head screw driver tip.
Tighten it down firmly.
Viper Gen4
(2008-10) Tips
The first step for this installation will be to set the tip in place over the factory exhaust pipe (see above for exact fit based on year of Viper) and rotate the tip so to position it what looks best to you. This tip is not designed to fit flush with your rocker panel it will stick out. Push the tip on to your stock exhaust using a rubber mallet until you meet resistance then stop. Do NOT use a hammer or hard dead shot mallet as this can damage the tip. A common SOFT rubber mallet will allow you to gently set the tip in place. It will still be a little lose. This is normal. The set screw is what holds it tight.
2. The next step will be to install the
set screw. Using the Right Angle Drill Adapter with the pilot a
9/64" bit - drill a hole just inside the factory exhaust pipe at a 10 o'clock position
for the driver side and a 2 o'clock position for the passenger side.
Because you will be drilling through two layers of metal you will want
to ream the hole a little so as to allow the set screw to be inserted
without binding or jamming. Due to the hard nature of the stainless tip
it is also important to know that you will need to use a hard cobalt
drill bit for this pilot hole.
NOTE: If you find it difficult to hold the tip and drill
the holes then try this; Insert the tip to the position you want
it to be installed. Mark the inside of the tip as to where you are
going to drill the hole for the set screw. Then remove the tip and
drill the hole into the inner wall only. Put the tip back on in
place and now insert the drill bit and drill the hole into your stock
exhaust. Once complete insert the screw and tighten it down as explained
in the next step 3.
3. Once you have e piloted the hole
simply insert the small black washer head style screws provided using
your Right Angle Drill Adapter and the Phillips head screw driver tip.
Tighten it down firmly.
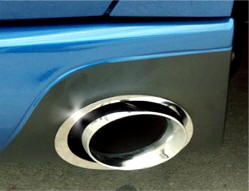
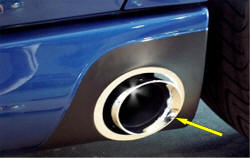
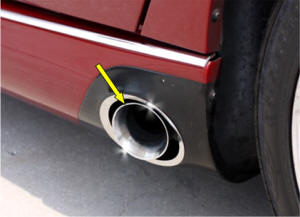
Exhaust Tip extended in position for Gen 3 Tip fits slightly differently on Gen 4's
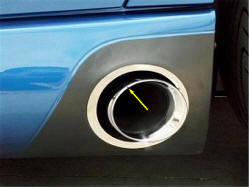
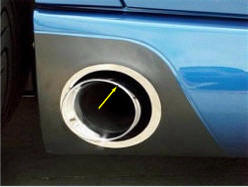

Drivers Side Screw for Gen 3 & 4 Passenger Side Screw
for Gen 3 & 4
90º Drive bit adapter
TheViperStore.com a
HotCarAccessories.com website