
Viper RT10 1997-2002 High Polished Stainless Steel Etched Trunk Lid Panel©
PART # ACC-961010 or ACC-961015
INSTALLATION INSTRUCTIONS
PARTS INCLUDED:
1 x Stainless Trunk Lid Panel, 1 x Adhesive Promoter Packet
Your new panel comes to you with a protective liner. Do not remove liner until installation is complete.
- Your new panel is designed to fit into the trunk lid cavity which will need to have some minor modifications performed in order to create adequate clearance. The first thing is to relocate the wire harness: you will notice that this harness has been routed by the factory very obtrusively into the trunk. We have come up with a way to reroute the wire so that it will not be noticeable. First cut the wire inside the trunk leaving enough room on the wire to reconnect it after rerouting.
- You will notice that the inner framework of the trunk lid has a gap large enough to slip the wire into. Drill a small 3/16” hole at the lower right hand corner of the lid at the side closest to the lid hinge. Once you have created the hole simply remove the wire loom from the wires and fish the wires completely thru. Seal the hole using 100% clear household silicone, a small tab will be sufficient.
- From inside the trunk area drill an additional hole as high up into the hinge cavity wall as you can looking at the outer side of the cavity so that you can determine the best spot for the hole to appear. Once the hole has been drilled route the wires into the trunk and reattach. Once the wires have been rerouted cut a length of the factory wire loom removed earlier slightly longer then the length of wire exposed and slip the loom over the exposed wire and tape the two ends with black electrical tape. Seal the wire entrance hole from the inside of the trunk with the clear silicone.
-
Since the
factory prop bar is located at the trunk cavity area it will need to
be removed as well as the catch clip. NOTE: We recommend purchasing
our lift arm kit for the truck
AZ-C95230
Lift Arm Trunk Kit
includes drill bits needed.
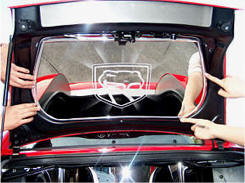
With all modifications completed you may now begin to install the new panel insert. You will notice a “V” shaped inner framework of the deck lid. Scrub this framework with household rubbing alcohol to remove any dirt or surface contaminants. Then swipe the area with the adhesive promoter provided. Once this has been completed place the panel in position and make note of its position and just how you are going to maneuver it in place. Place a large golf ball size blob of silicone to each of the areas between the attachment tape on the panel insert. Once this is done peel the red release liner and carefully place the panel into position and press firmly to set to the prepared framework. Allow the lid to remain vertical for several hours to set.
5. Remove protective liner
CARE AND MAINTENANCE:
Note: Care must be taken when cleaning your cover. It is a good idea to lightly dust your cover with a clean soft cloth first in order to prevent any particles from scratching it. Then wipe (using a new clean soft cloth) with a good quality streak free glass cleaner.
Questions? Please contact: admin@TheViperStore.com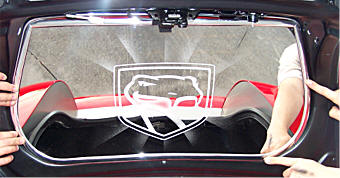
TheViperStore.com is a HotCarAccessories.com site
Copyright