DODGE RAM SRT 10 RADIATOR COVER
PART # DSRC402 PART # DSRC403
INSTALLATION INSTRUCTIONS
PARTS INCLUDED:
1 x Radiator Cover
2 x Self Tapping Screws
1 x Self Stick Bracket
2 x Adhesive Promoter Pack
2 x Decorative Thumb Screws
2 x Chrome Cap Covers/w Velcro Attachment
Your radiator cover comes to you with a protective liner. Do not remove liner until installation is complete.
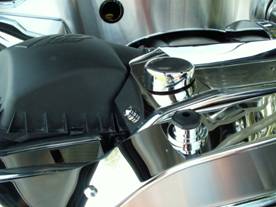
- Your new cover is designed to fit directly over the radiator and attaches to the two plastic brackets located at the left and right sides. You will notice that the white plastic overflow tank sits considerable higher then the top of the radiator and will need to be lowered in order to achieve a level plane. To do this, unbolt the tank and lift it out of the upper and lower notches that it sits in and allow the tank to drop a little.
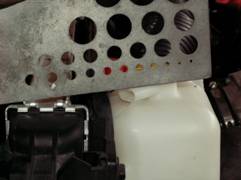
- Using a straight edge line up the top of the tanks vent tube with the top of the radiator. See picture #1. Bend the top left plastic tab so that it will wrap around the radiator support tab and fasten using one of the self tapping washer head screws provided. Shave the excess off this radiator tab so that it is level with the tab you just fastened. See picture #2.
- Trim the hole off the lower right tab so that you will be able to secure this tab to the bracket you unbolted it from using another one of the self tapping screws provided. See picture #3.
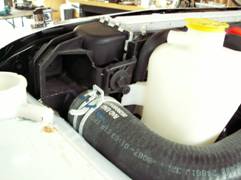
- You have been provided with a self stick bracket which will be used to secure the bottom tab of the overflow tank to the vehicle frame. Slip yourself under the front of the truck and locate the bottom of the tank. You will see a small tab close to the frame. Place the bracket hole over the tab of the tank and locate the area of the frame to be mounted. Scrub this area with household rubbing alcohol to remove all dirt and then swipe the area once with the adhesive promoter provided. Once this step is complete simply peel the red release liner from the bracket and press firmly to set in place. The last this you will need to do with the tank is to trim the cap. You will notice that the cap has a large finger pull around it simply cut the tab off completely this will allow the new cover to slip over the neck of the overflow tank and seat properly.
- Remove the radiator cap and the overflow cap and place your new cover into position. If everything has been done properly the new cover should sit nice and level however at this point it is okay if it is a little lopsided. You will notice two small holes at the two sides of the new cover. Using a 9/64th drill bit pilot these two hole locations directly into the plastic radiator brackets as you hold the new cover nice and level. Once this is done simply fasten the cover in position using the two decorative thumb screws provided. Replace the radiator and the overflow caps.
- You have been provided with two chrome cap covers with attachment cookies mounted to the underside. Scrub the tops of the radiator cap and the overflow cap with household rubbing alcohol and then swipe once with the adhesive promoter provided. Detach the attachment cookies from the two caps peel the release liner and firmly press them into the two factory radiator caps to set in position. Install decorative chrome caps in place.
If any questions occur during installation please call us at 352 688 8160 M-F.
CARE AND MAINTENANCE:
Note: Care must be
taken when cleaning your cover. It is a good idea to lightly dust your
cover with a clean soft cloth first in order to prevent any particles
from scratching it.
Then wipe (using a new clean soft cloth) with a good quality streak free
glass cleaner.
 #1
#1 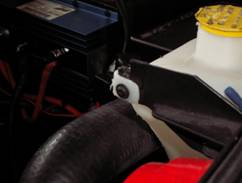 #2
#2
 #3
#3 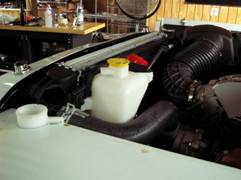 #4
#4