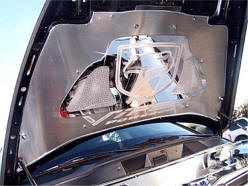
DODGE RAMSRT10
STAINLESS VENTED
HOOD PANEL
PART # DSHP103 & 104 patent pending
INSTALLATION INSTRUCTIONS
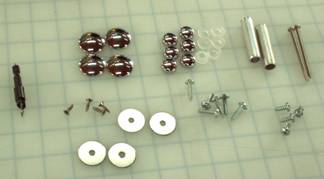 Parts Included:
1- Stainless Vented Hood Panel 6- Large White Nylon Sockets
1- Drill-Counter Sink 6- Large Chrome Screw Covers
4- Flat Head Screws 4- Large Decorative Caps
4- 3/8” #10 Pan Head Screws
4- Flat Head Washers
2- 2” Long Aluminum Spacers
2- 2 1/2” Long Screws
2- White Nylon Sockets
6- 3/4” Washer Head Screws
VERY IMPORTANT: PLEASE READ COMPLETE INSTRUCTIONS BEFORE BEGINNING INSTALLATION:
Your new hood panel comes to you with a protective liner. Do not remove liner until installation is complete.
Because of the immense size of this panel it will be necessary to have a couple of friends help you manipulate the panel into position.
- Remove the factory hood liner. This liner will not be reused. The new hood panel will provided an adequate thermal barrier. You will notice four studs securing the hood vent, trim these four studs flush with the push on retainers. You can do this by simply snipping off the excess with a pair of side cutters i.e. wire snips.
- Because the new panel is designed to cover the factory hood brackets you will need to install two positioning screws to each of the two hinges. You have been provided with a drill/countersink tool. Use this tool to pilot and bevel a hole at two locations to each hinge bracket close to the hood bolts. Once this is done install the four flat head screws provided. This installation will hold the hood in place well enough to allow you to remove the four main hood nuts.
- With the four hood nuts removed manipulate the hood panel over the bolt studs and finger the factory nuts over the studs as you manipulate the hood over the vent studs you trimmed earlier. You have been provided with four 3/8” #10 pan head screws and four flat head washers. As your two friends hold the panel set these four screw assemblies into the vent studs holes and hand tighten all four screws being careful not to over tighten as this will strip the plastic stud. Then tighten the four main hood nuts.
- At this point although very unstable from the hood panels weight you will now be able to pilot the eight remaining hole locations. Carefully pilot a 9/64ths hole in the hood sub-frame at all hole locations. You will notice that the two lower most center holes have a long distance from the new panel and hood. Carefully pilot these holes as straight as possible. You have been provided with two 2” long aluminum spacers. Place the two 2 1/2” long screws thru the white nylon screw sockets and insert each screw thru the panel hole thru the long spacer and snug the panel to the hood. TECH TIP: Be careful not to over tighten these screws as this will strip the hood metal. You may also want to add a little instant adhesive to the tip of the screw this will help these screws from vibrating loose.
- Place the remaining screw assemblies into the new panel and snug all screws. You have been provided with four large decorative caps. Place a small dab of 100% clear household silicone to the underside of each cap and place them over the four screws at the hood vent location. Allow a couple of hours to set.
- Remove protective liner.
If any questions occur
during installation please call American Car Craft at 727 861-1500.
CARE AND MAINTENANCE:
Note: Care must
be taken when cleaning your cover. It is a good idea to lightly dust
your cover with a clean soft cloth first in order to prevent any
particles from scratching it. Then wipe (using a new clean soft cloth)
with a good quality streak free glass cleaner.