![]()
VIPER UPGRADE PRODUCTS

|
|
|
|
This Frame has opened up
into a New Window
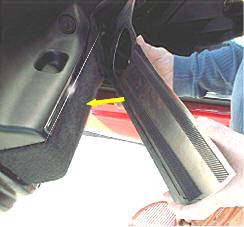
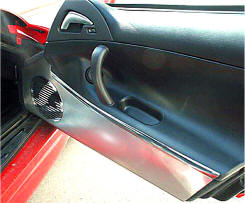
Items Included: Your new door panels come to you with a protective liner. Do not remove liner until step 3. 1. Your new door panels come to you pre-shaped however it will be necessary to slightly form by hand in order to achieve a nice contoured fit. You will notice a red attachment cookie on the rear underside corner of the panel. Place the large piece over door panel carpet about 1/8th of an inch away from the door edge but do not actually set panel to the carpet just yet. MAKE NOTE of the area where the red cookie will lie. You have been provided with a stainless washer which also has a red attachment cookie on it. Using a screw gun fasten this stainless cookie in the position noted earlier where the attachment cookie on the underside of the panel is going to lie using one of the stainless flat head screws provided. 2. Place the large panel in position just under the vinyl door handle and directly over the factory speaker grille. Press the inner hole of the speaker grille opening firmly against the door panel and pilot a 1/8” hole thru the carpet into the door panel. Then repeat for the opposite hole. 3. Once your holes have been properly piloted remove the protective liner and place the smaller polished stainless grille over the grille opening and fasten using the stainless pan head screws provided. 4. Lift the rear corner of the large door panel and remove the red liner from both the door panel insert and the stainless washer. These two areas should line up with each other and will permanently attach once pressed to each other. You have been provided with two lengths of black chrome trim. Be sure to select the correct one that matches the angle of the door panel that you are working on.
5.
This
trim is provided to close any gaps between the factory door handle and the
new brushed door panel insert. It is to be mounted directly to the factory
door panel vinyl. Begin by prepping this area first with household rubbing
alcohol and then swipe the area once with the adhesive promoter pack
provided. Use several cloths and change them frequently so that you will actually be removing the silicone instead of just pushing it around. Once the Armor-all has been removed then you may proceed with step 5. Once your area has been prepared properly begin applying the black chrome trim at the door edge and work along the door handle closing the gap and creating a nice seam between it and the door panel insert. As you approach the front of the panel you will notice a relatively large gap, allow the end of the trim to slide directly into this gap closing the gap and finishing the installation. 6. Repeat this process for the opposite door. CARE AND MAINTENANCE:
Note: Care
must be taken when cleaning your covers. Use a clean soft cloth first in
order to prevent any particles from scratching it. Then wipe with a good
quality streak free glass cleaner.
|
|
This Frame has opened up into a New Window |