![]()
DODGE RAM SRT10 Firewall
PART# DSFW202, PART# DSFW203, PART# DRFW200, PART# DRFW201 patent pending
INSTALLATION INSTRUCTIONS
PARTS INCLUDED:
2pc Stainless Firewall
4- Zip Ties
8- 1” Oval Head Screws
8- Flat Chrome Screw Covers
Your new cover comes to you with a protective liner. Do not remove liner until installation is complete.
In order to install your new false firewall it will be necessary to make some minor modifications to the wiper cowl and firewall areas.
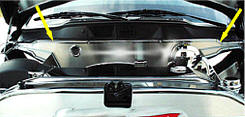
- Remove the black insulation pad from the wiper cowl area. NOTE: This will not be reused. You will notice that the wiper cowl is fastened to the firewall ridge via several black push in retainers. Remove all these retainers so that you will be able to lift the front of the cowl just enough to slip the top section of the new firewall under it far enough to allow you to line up the holes in your new cover with the retainer holes that you just exposed. You will need to temporarily disconnect the washer supply tube as well as the electrical harness at the passenger side of the firewall. Remove the connector from the harness by slitting the loom to allow some of the wire to escape from the harness so that you will have enough length to reattach the connector later.
- You will notice a relatively heavy electrical harness attached to several points of the firewall ridge. Detach this harness at all points and allow the cable to fall away from the ridge. Attach the cable to the engines harness using the zip ties provided. Install the top section of the firewall and attach at all holes using the factory retainers.
- With the top section secured properly slide the larger section down between the master cylinder reservoir and over the brake booster vacuum check valve. This will require some help of a friend as it will need to be forced down into position uniformly. As you approach the fender ridge allow the false firewall to buckle slightly to allow the firewall to slip under the fender ridge. You will notice six small holes in the large section that match the holes in the small section. Line up these holes using a pointer or pick and fasten the two sections together using the six 1” oval head screws provided. Once the two sections have been successfully attached to each other hide the screw heads using the six flat chrome screw caps provided.
- Reattach your washer fluid supply tube and your electrical harness. Remove the protective liner.
If any questions occur during installation please call American Car Craft at 727 861-1500.
CARE AND MAINTENANCE:
Care must be taken when
cleaning your cover. It is a good idea to lightly dust your cover with a
clean soft cloth first in order to prevent any particles from scratching
it. Then wipe (using a new clean soft cloth) with a good quality streak
free glass cleaner.
0
TheViperStore.com a HotCarAccessories.com site