
DODGE RAM SRT-10 Radiator Support Cap
PART #ACC-DRRS404 and ACC-DRRS405 patent pending
INSTALLATION INSTRUCTIONS
PARTS INCLUDED:
Radiator Support Cap
Adhesive Promoter
1- ¾” x 12”Length of Attachment Tape
2-1 ½” Black Washer Head Screws
2-White Sockets
2- Large Chrome Snap Caps
2- 1” Chrome Bolt Covers
Your new radiator support cover is a unique accessory designed to restyle an area of your truck that otherwise could not be customized. To enjoy this custom part it will be necessary to perform some modifications to the radiator support area in order for it to accept this part.
Your radiator support comes to you with a protective liner. Do not remove liner until installation is complete.
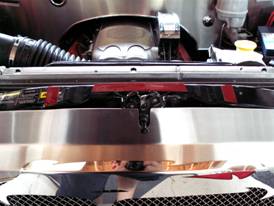
- The trucks air box top support bracket is an extruded plastic tab that must be sanded flush to the radiator support so that the new stainless cover can lay over this area and extend across to the factory fender bolt (see picture #1). The easiest and fastest way to accomplish this is with a common cut off wheel. Simply shave the plastic gusset off the extended tab protruding from the air box all the way to the radiator support. Since the factory radiator support bolt that fastens this bracket rest higher then the one next to it, it will also be necessary to use the cut off wheel to level the height so that they are both even. If done properly the new stainless cover will lay over this area concealing the modification completely (see picture #2).
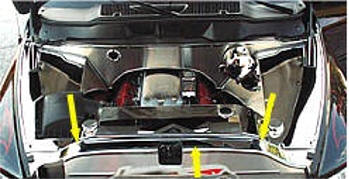
- The next two areas to be modified are the two hood stop receivers. Remove the two plastic hood stops and set aside. You will notice that the black plastic receivers have a pretty substantial wedge shape to them. This shape must also be shaved to a level shape in order to accept the new part. Simply file these two square hood stop bases flush with the front part of the radiator support then as close to the support as you can at the back without shaving it completely off (see picture #3). This will create an adequate plane which will accept the new part. Finally you have been supplied with a length of 3M attachment tape. This tape is to be applied directly to the radiator support areas behind the hood latch and at both the left and right sides. Scrub these areas first with household rubbing alcohol to remove any dirt the swipe once with the adhesive promoter provided (see picture #4). Before you place the attachment tape to the two side areas tap these two humps down slightly with a hammer to level the area a little more then place the tape into position.
- With all the above preparations made remove the two front fender bolts. Place the new radiator support cover into position. Although your new cap comes to you pre shaped it will be necessary to gently adjust its shape by hand in order to achieve a nice contoured fit. Simply center the cover and work the ends down into the shape of the radiator support especially into the curved area as you match up the fender bolt holes at the two ends. Also be sure to line up the two hood stop areas. You may temporarily install the hood stops to help keep the cover in position as you form the two ends.
- Once shaping is complete peel the red release liner from the attachment tape that you placed earlier and carefully place the new cover into position. Press firmly to set all taped areas. Work the cover to the sides and force the cover into the curve of the support and line up the fender bolt holes and insert the bolts at both ends and snug down.
- You will notice a small hole at both ends of the new cover centered at the curved area. Drill a pilot hole with a 9/64 drill bit at both locations and blow away any and all shavings. Place the two #8 pan head screws provided thru the two white screw cover sockets provided and fasten the cover just snug to the support. Then snap the two chrome screw cover provided in place. Tighten the fender bolts. You have been provided with two 1” chrome bolt covers for these fender bolts simply glue them over the bolt heads using a small dab of 100% clear household silicone and allow a couple of hours to set.
- Remove protective liner.
If any questions occur during installation please call American Car Craft at 727 861-1500.
CARE AND MAINTENANCE:
Note: Care must be taken when cleaning your cover. It is a good idea to lightly dust your cover with a clean soft cloth first in order to prevent any particles from scratching it. Then wipe (using a new clean soft cloth) with a good quality streak free glass cleaner.
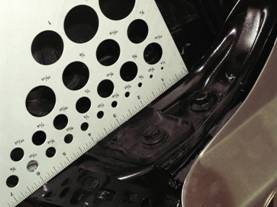
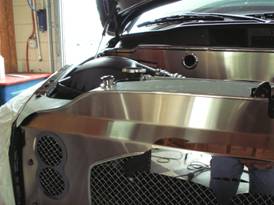
Picture #1 Picture #2
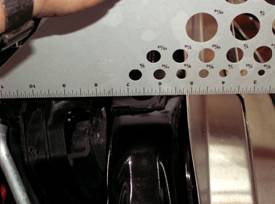
Picture #3 Picture #4
12
copyright
TheViperStore.com is a HotCarAccessories site