
This Frame has opened up into a New Window
DODGE VIPER 1992-2002
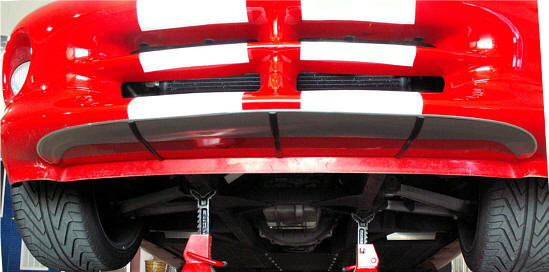
BODY CHIN GUARD©
Part# ACC-962012
INSTALLATION INSTRUCTIONS
PARTS INCLUDED:
1 x 3pc Stainless Chin Guard, 1 x
Adhesive Promoter Packet, 1 x Adhesive Promoter Tube, 6 x (Black 5/8
9" x 3) strips, 1 x 1/4" Cowls 53"
YOUR PANEL COMES TO YOU WITH A PROTECTIVE LINER. DO NOT REMOVE THIS LINER UNTIL INSTALLATION IS COMPLETE!
This sectional cover has been designed to protect
the painted area most vulnerable to the road speed bumps parking stops
and curbing. It is simple to install and will protect your front body
chin for the life of your Viper.
- In order to install this kit you will need to create some clearance by jacking the vehicle up and securing its height with a couple of jack stand for safety.
- Scrub the nose chin area first with alcohol to remove road grime and dirt as well as any wax. It is important that this be done with some brute force so as to clean the area thoroughly so that the automotive tape on the back of your Chin Guard will stick firmly. Once this is complete, wipe the area with the adhesive promoter in the packet provided. The promoter is NOT a cleaner but a bonding agent needed to insure long term installation of this part.
- Looking up at the bottom of the car you will notice a center hole just behind the nose ridge. Use this hole as a guide to locate the center section of the three chin guard pieces. The center section will have a line indicating its center. Place the section onto the nose and measure up from the ridge approximately 5 1/4’’ to both ends of the section. This will lead you to the correct position and level of the first section. Mark all three points of the position to the paint with a common pencil.
- Now that you have established the position of the first section take a look at the part in position and check the fit and shape of the section to make sure that it contours nicely to the shape of the car and make any adjustment by hand if necessary. When you are satisfied with the fit simply remove the red release liner from the back of the part and carefully reposition the section pressing firmly to set.
- Now that you have successfully installed the center section the rest is relatively easy. Place each of the two side section in place directly to the center sections side edge and check the shape and fit. Make any adjustment if needed then simply peel and stick the two sections in place also pressing very firmly to set.
- Apply a thin bead of adhesive promoter to the paint at the very front edge of the three sections running along to the sides. You have been provided with a length of chrome edge trim. Apply the trim directly to the paint and up tight to the side edge of either end section or then press the trim along the entire length of all three sections until you reach the opposite side. This trim will nicely finish the front edge of the chin guard. Remove protective liner.
- You have been provided with three lengths of black molding. This molding can be applied as an option to the two seams of the three sections and also to the center section to add some additional protection of the chin guard itself. Should you elect to apply the molding simply run a bead of adhesive promoter to the seams and center section then peel and stick them in place. Start from the front and snip the correct length using a scissor. Press firmly to set.
If any questions occur during installation, please contact: admin@TheViperStore.com.
Note: Care must be taken when cleaning your new exhaust tips always wait until they have cooled down from use. Wipe down with a clean soft cloth first in order to prevent any particles from scratching it. Then wipe (using a new clean soft cloth) with a good quality streak free glass cleaner or stainless steel polish.

13© TheViperStore.com
This Frame has opened up into a New Window